
How to Shade with Colors
When we needlepoint, most of our projects appear flat. This is because we are filling in areas with stitches using a thread which is overdyed, variegated or all one color. This is fine if we wish to create a modern or contemporary feel to our project. But, for realism, shading is required.

To do so, you need to add light values for highlights and dark for shadows and recessed areas. (Value is the darkest to lightest shade of a color.)
A printed canvas might have shading already printed on the design. This makes stitching much easier for you. If the motif doesn't have shading or you are designing your own, you need some simple rules to follow.
Rules for Shading
A printed canvas might have shading already printed on the design. This makes stitching much easier for you. If the motif doesn’t have shading or you are designing your own, you need some simple rules to follow.

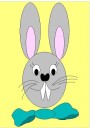
1. The light source should come from only one area.
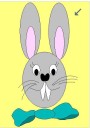 Notice the arrow in the upper right corner.
2. Once you chose which direction the light is coming from, stick to it. If you change the light source in the middle of your project, the end result will be a mess. You may wish to draw an arrow to indicate which direction the light is coming from.

3. Shadows are on the opposite side of the light source.

4. Light is highlights and dark is shadows. Don't reverse this.
Shadows
To work, choose a darker shade of the color of your area and stitch as desired.
Another option is to over stitch in the shaded area to create the appearance of shadows. To over stitch, you will stitch the area in the desired color. Once this is completed, stitch over the stitches in a darker shade using 1 or 2 strands in the needle. Be sure you do not over crowd the canvas.
Also see: How To Create Shadows
Skies
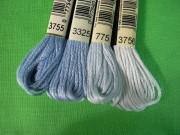
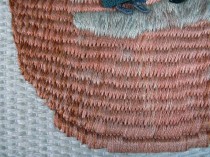
To create a realistic sky, shading is very simple. Choose which blue you would like for your sky and pick a value range. When picking out values, do not pick up the complete range. Also, choose 4 color numbers next to one another on the thread chart. Do not skip a value. This will make your sky look silly. In the photo, you will see DMC numbers 3753, 775, 3355 and 3755. We will call these A, B, C and D repectively.
Count how many rows of sky you will fill in. Let's say you have 19 rows. Place your skeins on the table from dark to light. After cutting the skeins into stitching lengths, strip the threads. You are now ready to blend into 17 bundles.
The Chart below will show you a good blending combination. We will start with row 1 which is the top and row 19 as the sky line.
|
Row |
Colors & Strands | Row | Colors & Strands |
| 1 | A-6 | 11 | B-2 C-4 |
| 2 | A-5 B-1 | 12 |
B-1 C-5 |
| 3 | A-4 B-2 | 13 | C-6 |
| 4 | A-3 B-3 | 14 | C-5 D-1 |
| 5 |
A-2 B-4 |
15 | C-4 D-2 |
| 6 | A-1 B-5 | 16 | C-3 D-3 |
| 7 | B-6 | 17 | C-2 D-4 |
| 8 | B-5 C-1 | 18 | C-1 D-5 |
| 9 | B-4 C-2 | 19 | D-6 |
| 10 | B-3 C-3 |
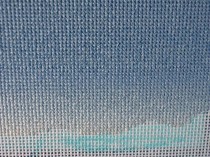
With each color combination in the needle, stitch one row in Continental. Be sure you do not reverse any of the rows. Your sky will not blend correctly. If you have more rows of sky and do not wish to add another shade, stitch 2 rows of the same color combination next to one another.
In the photograph on the right, you will see a work in progress. The sky was stitched in Continental using the color combination as described above. Each row blends from dark to light as your eye travels from the upper sky down to the skyline.


