
How to Start & End a Thread
To start stitching, your thread should be no longer than 18” to 20” long. Any longer, and the thread will wear out before you have finished stitching the entire length. Using an extremely long piece of thread can cause thread, by the time you have stitched with the entire length, to wear to the point where it shows the canvas grid. When working such very large stitches such as Florentine, Bargello and others, longer threads can be used.
Also, see Grain of Thread/Yarn on Tips & Techniques page.
Waste Knot

Anchor your thread using a waste knot. Start with a threaded needle, and make a knot at the end of your thread. Come out about 1 ½” away from your first stitch. This will leave a trail of yarn underneath the canvas. Then make your set of stitches, traveling over the front of the canvas toward the knot. The stitches should cover the thread under the canvas. This serves to secure the end without leaving an unsightly bump on the canvas. When you reach the knot, simply snip it off with your scissors. This is a fine way to start stitching on an empty canvas, or in an area far from areas you have already worked.
Anchoring "L"

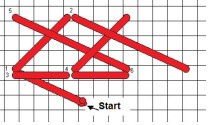
Another good method for anchoring in the tail is the Securing “L” technique. A knot is avoided before stitching. Thread your needle as desired. You will want to make the “L” four or five intersections away from where you wish to start stitching. Begin on the top of the canvas, insert your needle downward. Come up at 1 on the graph. Your next stitch goes down at 2, and up at 3. The “L” is formed when you insert the needle down again at 4. Bring the needle up on top of the canvas a few threads away from the “L”. Your thread is anchored. This method is appropriate for many different stitches. The “L” can be completely worked over your needlepoint stitches, without removing it. The only clipping required is the tail, which you used to start the anchoring.
Away Knot
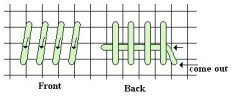
In our graph, we see Belgium Cross. The underside of the canvas will not be covered enough to anchor our thread. To solve this problem, use an away knot. Start with a threaded needle and knot the end of your thread. This is just like waste knot. The exception will be how you start stitching. Put your down under the canvas away from the area in which you would like to stitch. Come up in the desired area for your stitching and start to create the stitch. When you are finished, end the thread as needed.
Now, when you are ready to stitch in the area where your knot is, do so. You will want to tack down the thread which is on the under side of the canvas just like you did before with waste knot. As you come to the knot, cut it off and continue to stitch.
Ending a Thread
To end your thread, finish your stitch by bringing the thread to the underside of the canvas. Run your needle under a few stitches and cut the remainder off. If your thread is slippery, you may wish to make a longer tail or run it back again in the opposite direction. To prevent ghost from appearing, anchor in the same color you are working. Never leave knots on the back of your work.


